Until recently, creating dynamic remarketing in Google AdWords without Google Merchant Center support was quite a complex procedure. Read this guide to learn how to handle this task.
The answer is positive: with a special type of remarketing, you can remind users not only about your company but also about specific services or products they were interested in on your website. This can be done using dynamic product remarketing from Google AdWords. It’s worth noting that at the time of writing this guide, Google Merchant Center support is not available in Ukraine.
This significantly complicates the task of creating dynamic remarketing, but it does not make it impossible! While most PPC specialists discuss the possibility of using this type of remarketing, Roman Chernysh, Head of the PPC Department at seomarket, found a way to achieve results right now. To ensure the most reliable use of this advertising tool, our specialist developed a detailed instruction manual. We hope this step-by-step guide will help increase the effectiveness of your online advertising.
Structurally, the guide is divided into the following sections, which will be described in detail:

Preparing a product or service feed
A product feed is a data export of the store’s product offerings and their attributes in a specific format. Feed requirements:
➤ Supported formats: CSV, TSV, XLS, or XLSX.
➤ Only products or services should be listed in the rows.
➤ Columns must contain the attributes of each product from the list (unique identifiers, prices, descriptions).
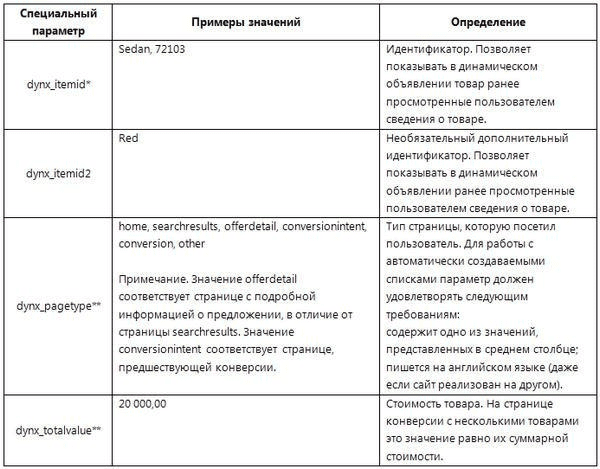
➤ Letters and spaces must match those specified in the specification (Table 1.1). Such identifiers are highly important: they allow the remarketing tag to match people from the lists with the products they have already viewed.
➤ If it becomes necessary to add a column after uploading the feed to AdWords, create a new feed.
➤ If the offered products or services are available in multiple countries, create a feed for each language and currency.
Specification
To create a product feed, you need a Google Merchant Center account. In Ukraine, as in several other countries, Google Merchant Center is not supported. To work around this limitation, use an alternative method for creating a product feed — the “Custom Feed.”
You can download a CSV template for the Custom Feed here: http://www.gstatic.com/adextensions/custom-feed-template.csv
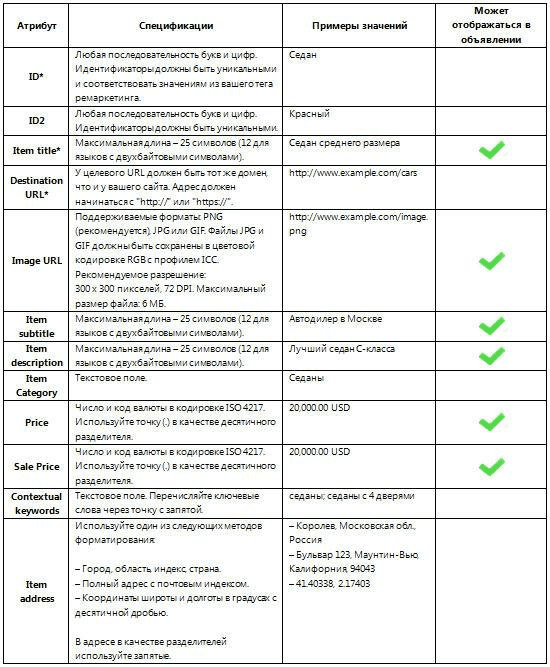
Table 1.1 – Product Feed Specification *Mandatory to Fill
Example 1
➤ Let’s prepare a feed for a sporting goods store. We will create a feed with a single product offer and fill in the columns according to the specification data (Fig. 1.1.).

Fig. 1.1 – Feed for a Sporting Goods Store Using a Single Product Example
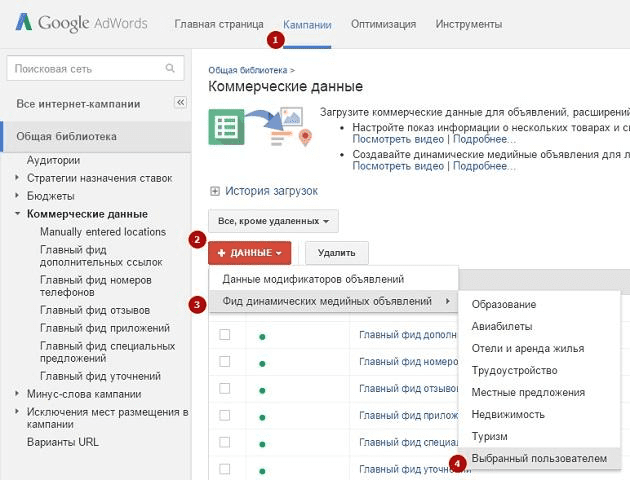
Fig. 1.2 – Uploading the Feed in the Google AdWords Interface
➤ Enter the name of your product feed, then select the actual export file and click “Upload and Preview” (Fig. 1.3.)
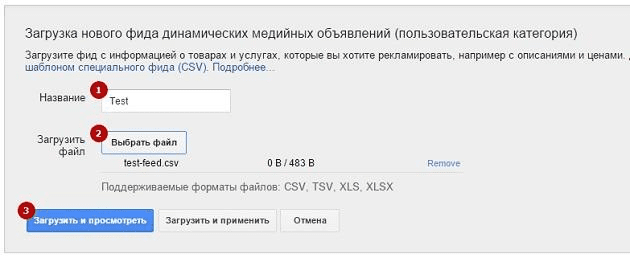
Fig. 1.3 – Uploading the Feed in the Google AdWords Interface
➤ If the feed is correctly formatted and error-free, a message will appear showing the number of added rows, i.e., products (Fig. 1.4.). Note that errors related to images or URLs may appear after 3–4 hours.
Fig. 1.4 – Successful Feed Upload
➤ After applying the changes, a new entry with the name of our feed will appear in the overall list under the “Business Data” section (Fig. 1.5.). Now, you just need to wait for the moderation process to complete. Once uploaded, the file is assigned the status “Pending Review.”
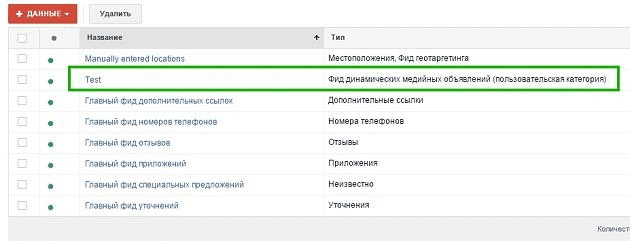
Fig. 1.5 – “Business Data” – New Entry
➤ After successfully passing moderation, the status will change to “Approved.”
Installing the tag with custom parameters
1. Why a remarketing tag Is needed
To use dynamic remarketing, the most important requirement is to have a remarketing tag with custom parameters on your website pages.
2. Obtaining the tag in your AdWords Account
To get the tag in your AdWords account:
➤ Go to the "Shared Library" and open the "Audiences" section.
➤ The tag code must be added to all pages of the website immediately before the body tag.
➤ The code should be in JSON format, intended for transmitting structured data in advertising networks.
3. Creating a tag based on an existing one
A dynamic remarketing tag can be created based on an already existing standard tag (if one is being used). This allows you to send additional information to AdWords.
4. Structure of the remarketing tag
The tag consists of two parts:
➤ Static part — contains the basic information about the website.
➤ Dynamic part — this is where variable values (special parameters) are inserted, required for collecting information about product or service identifiers, page types, and other data.
5. Custom parameters
➤ This is the only way to dynamically send values based on page data to an AdWords account.
➤ To use dynamic remarketing in retail, a Google Merchant Center account is required.
➤ At the time of writing this guide, Google Merchant Center is not supported in Ukraine, Belarus, Kazakhstan, and several other countries.
➤ An alternative method is to use the "Special type" of custom parameters, which will be explained later.
“Special type” custom parameters specification
Important: Installing the remarketing tag on your website and configuring custom parameters can be delegated to a webmaster or performed independently using Google Tag Manager.
This guide covers the implementation of dynamic remarketing via Google Tag Manager. Example of the setup:
1. Creating a new tag in google tag manager
In the main tag settings (Fig. 1.6):
➤ Specify the "Tag Name."
➤ Set the "Tag Type" to "AdWords Remarketing."
➤ Enter the "Conversion ID" (ID from the main remarketing tag).
2. Setting trigger rules for the tag
Set two conditions:
3. Passing control to the browser
By default, tags fire when the gtm.js script finishes and control is handed over to the browser. However, you can configure the tag to fire when the DOM is ready.
Example: the tag needs to read the value of Trip ID (using one of the DOM element macro types), which is not available until the bottom of the page has loaded. By default, the tag might fire before the Trip ID value becomes available.
To ensure the tag fires after the page is fully loaded, add the following condition to the trigger rule: event equals gtm.dom.

Fig. 1.6 – Basic settings of the remarketing tag
Additional settings of the current tag
Proceed to the additional settings of the current tag and configure the following values (Fig. 1.7.):
1.Custom parameters:
➤ Select "Set manually."
2.Adding custom parameters:
➤ Click "Add Custom Parameters."
➤ Key: dynx_itemid; the key value must exactly match the ID value in the product feed.
➤ Value: create a "New Macro."
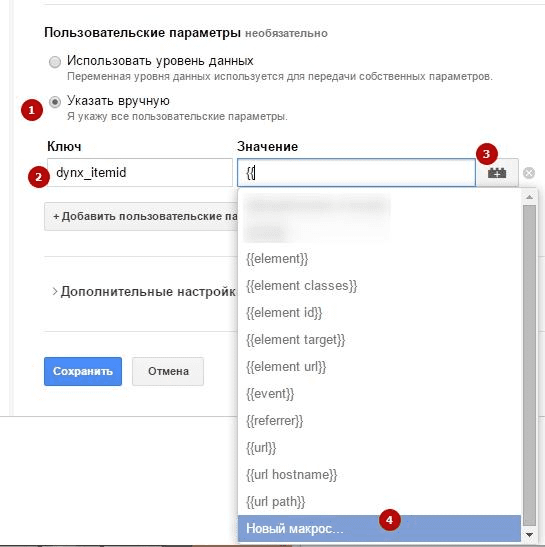
Fig. 1.7 – Custom Parameters in Google Tag Manager
Setting up a new macro
To create a new macro (Fig. 1.8):
This guide shows only one example, as the product ID is the main value required for the dynamic remarketing functionality.
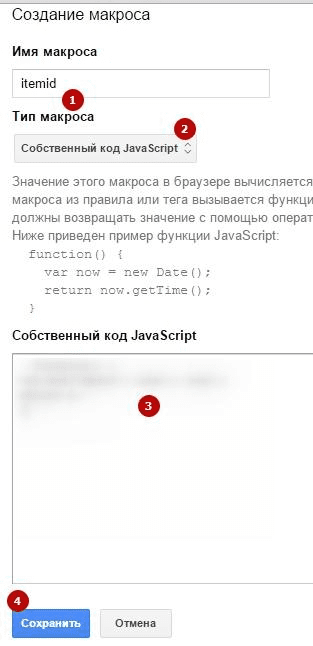
Fig. 1.8 – Creating a New Macro in Google Tag Manager
Verifying tag functionality
After saving the macro, you need to save, create, and publish a new version of the tag on the website. Important! After publishing a new tag version, always use the preview mode in debug mode to check that it functions correctly.
Detailed tag information
You can verify the tag’s performance in the Google AdWords interface: “Shared Library” → “Audiences” → “Tag Information” (Fig. 1.9.). In the detailed information for the remarketing tag, you will see the entry: “Custom parameters active” – the custom parameter dynx_itemid is active.
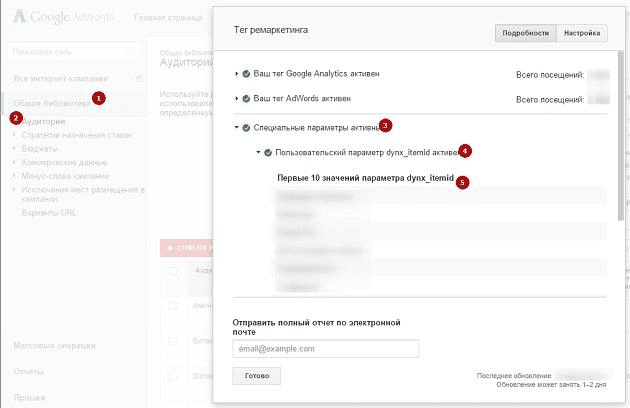
Fig. 1.9. – Custom Parameters Active
Dynamic ad builder
Dynamic display ads allow you to generate advertisements for your products or services using a data feed. These ads can be created when setting up remarketing campaigns via the Ad Formats Gallery. You can either specify a particular ad layout or use the automatic selection.
➤ Create a new campaign, campaign type "Display Network only" – "Remarketing."
➤ In the settings, enable "Use dynamic ads" (Fig. 2.0).
➤ Business type – "Other (custom option)."
➤ In the "Feed" dropdown, select the name of the product feed uploaded earlier.
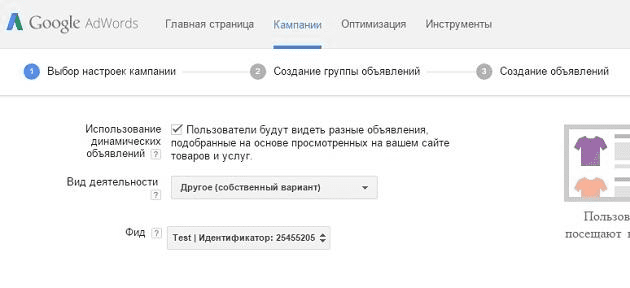
Fig. 2.0 – Main Campaign Settings
Ad formats gallery
After completing the campaign setup stage and creating ad groups, we come to the most interesting part – “Creating Ads.” At this stage, you can fully utilize your creative and artistic skills using the Ad Formats Gallery. A wide range of layouts and settings is available for your use. A preview mode is also available, allowing you to see how your ad will be displayed.
Here is an example of what can be generated based on our product feed (see Fig. 2.1.).
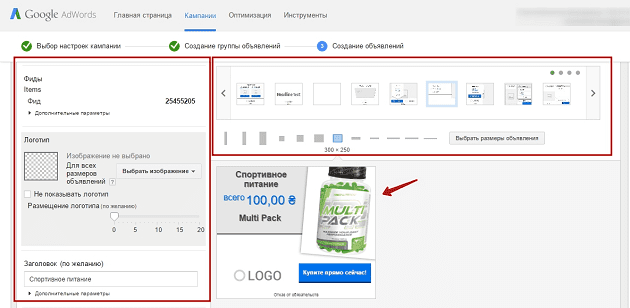
Fig. 2.1 – Example of an Ad
Implementing dynamic remarketing
After previewing, all ads must be saved. All ads will start displaying once they pass moderation. That’s it!
We hope that the example provided for creating dynamic remarketing aimed at showcasing product offers has helped you expand your knowledge and that you can start implementing it in your accounts today using Google AdWords advertising.